

Pokemon SoulSilver (ssrecomp)
Port nativo de Pokemon SoulSilver (ssrecomp) para PC.
Pokemon SoulSilver (ssrecomp)
Port nativo basado en su ficha de origen.
README del repositorio
THIS PROJECT IS NOT BEING WORKED ON AND WILL NOT RECEIVE UPDATES
I am working on this now which is superior to this project: pokeheartgold-single-screen
ssrecomp
A native build of Pokémon SoulSilver for single-screen devices. The game's ARM9
code is statically recompiled to C++ from the pokeheartgold decompilation's
build output; the melonDS core (GPLv3, vendored in melonDS/ at tag 1.1 with a
few patches) provides the DS hardware: graphics, sound, cartridge, save memory
and the ARM7.
Made with heavy use of AI. Nearly all of the code, documentation and testing in this project was done by an AI coding assistant (Anthropic's Claude, through Claude Code), directed and play-tested by the maintainer. Expect bugs a person would not have made, and review the code with that in mind before reusing it.
This repository contains no game code or data. It holds the recompiler,
the runtime and the frontend. The game-specific part (gen/) is generated on
your own machine from your own build of
pret/pokeheartgold, which in turn needs
your own copy of the game; see "Building". Do not commit gen/, ROMs, saves or
save states to this repository.
Not affiliated with or endorsed by Nintendo, Game Freak, The Pokémon Company, pret or the melonDS project. Pokémon is a trademark of its owners. Because it is AI-written, do not submit any of it to pret, whose contribution rules do not accept such work.
Screenshots
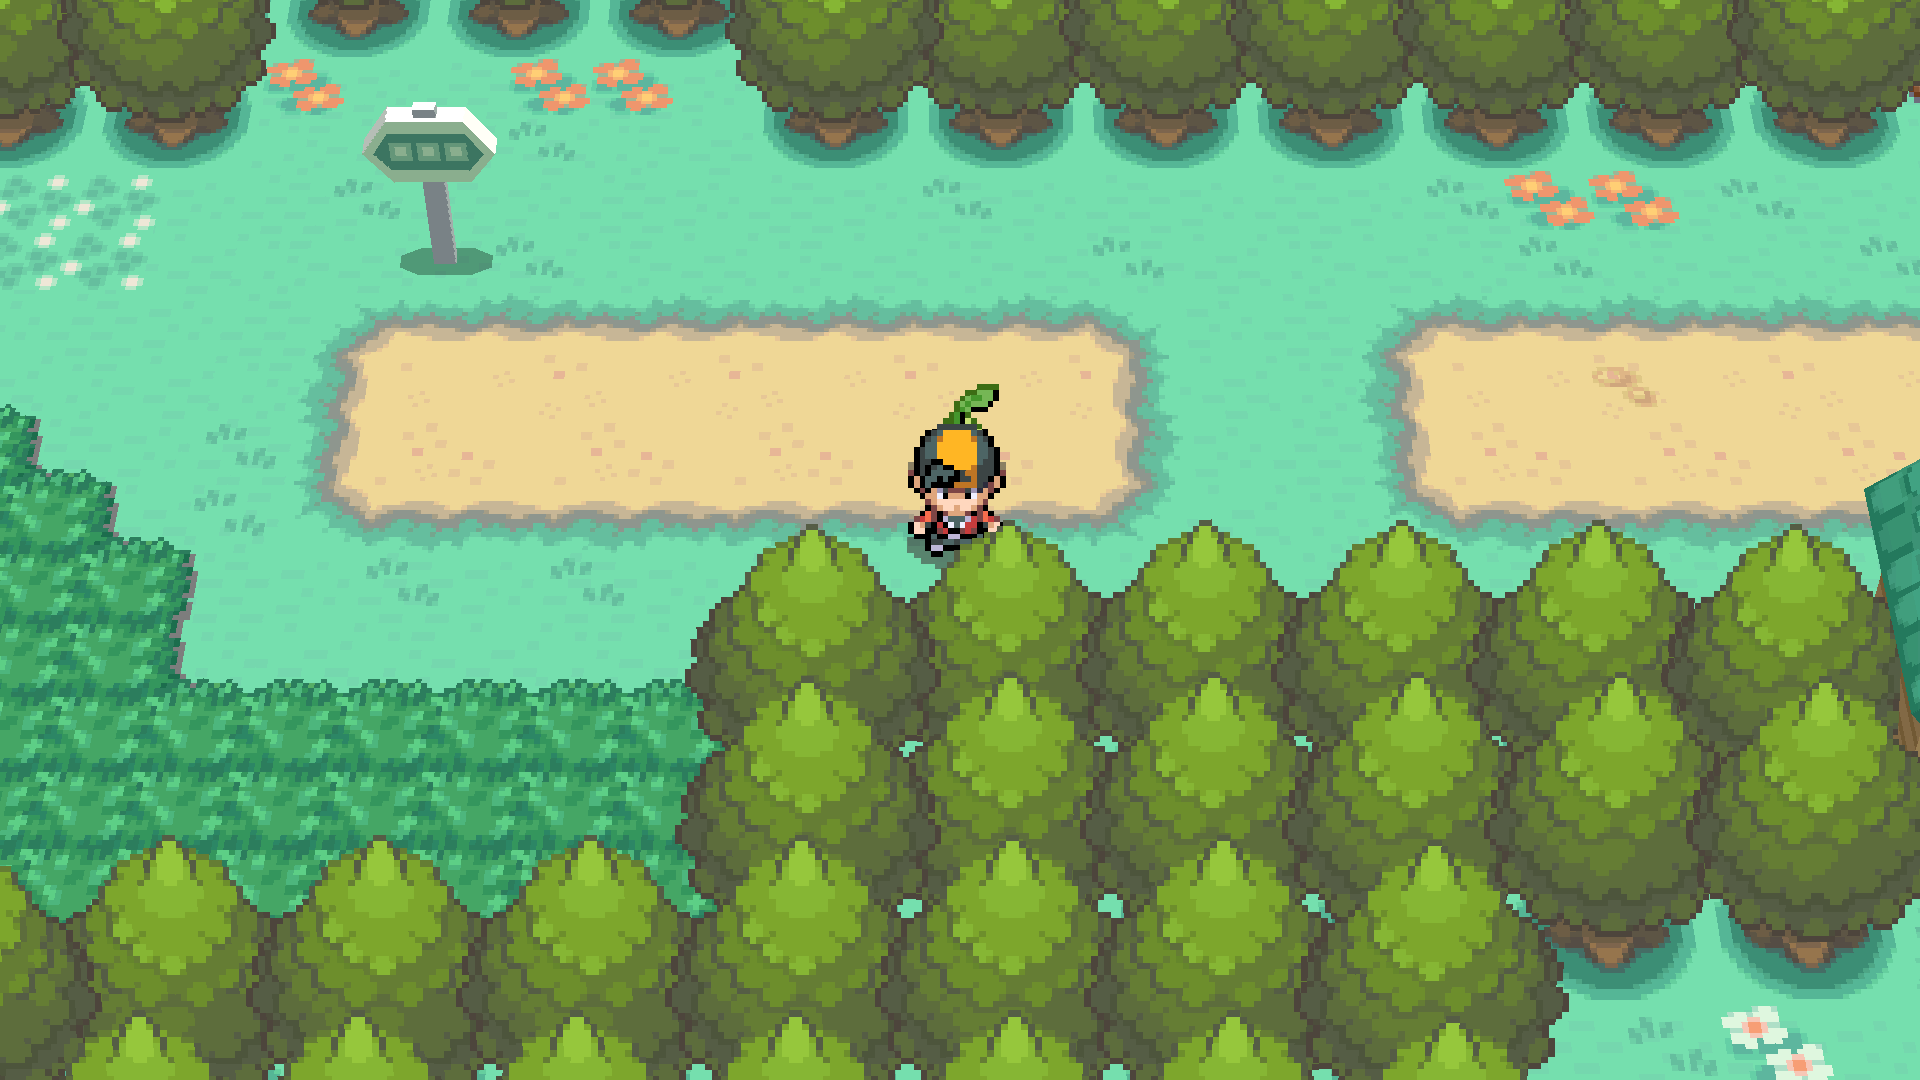
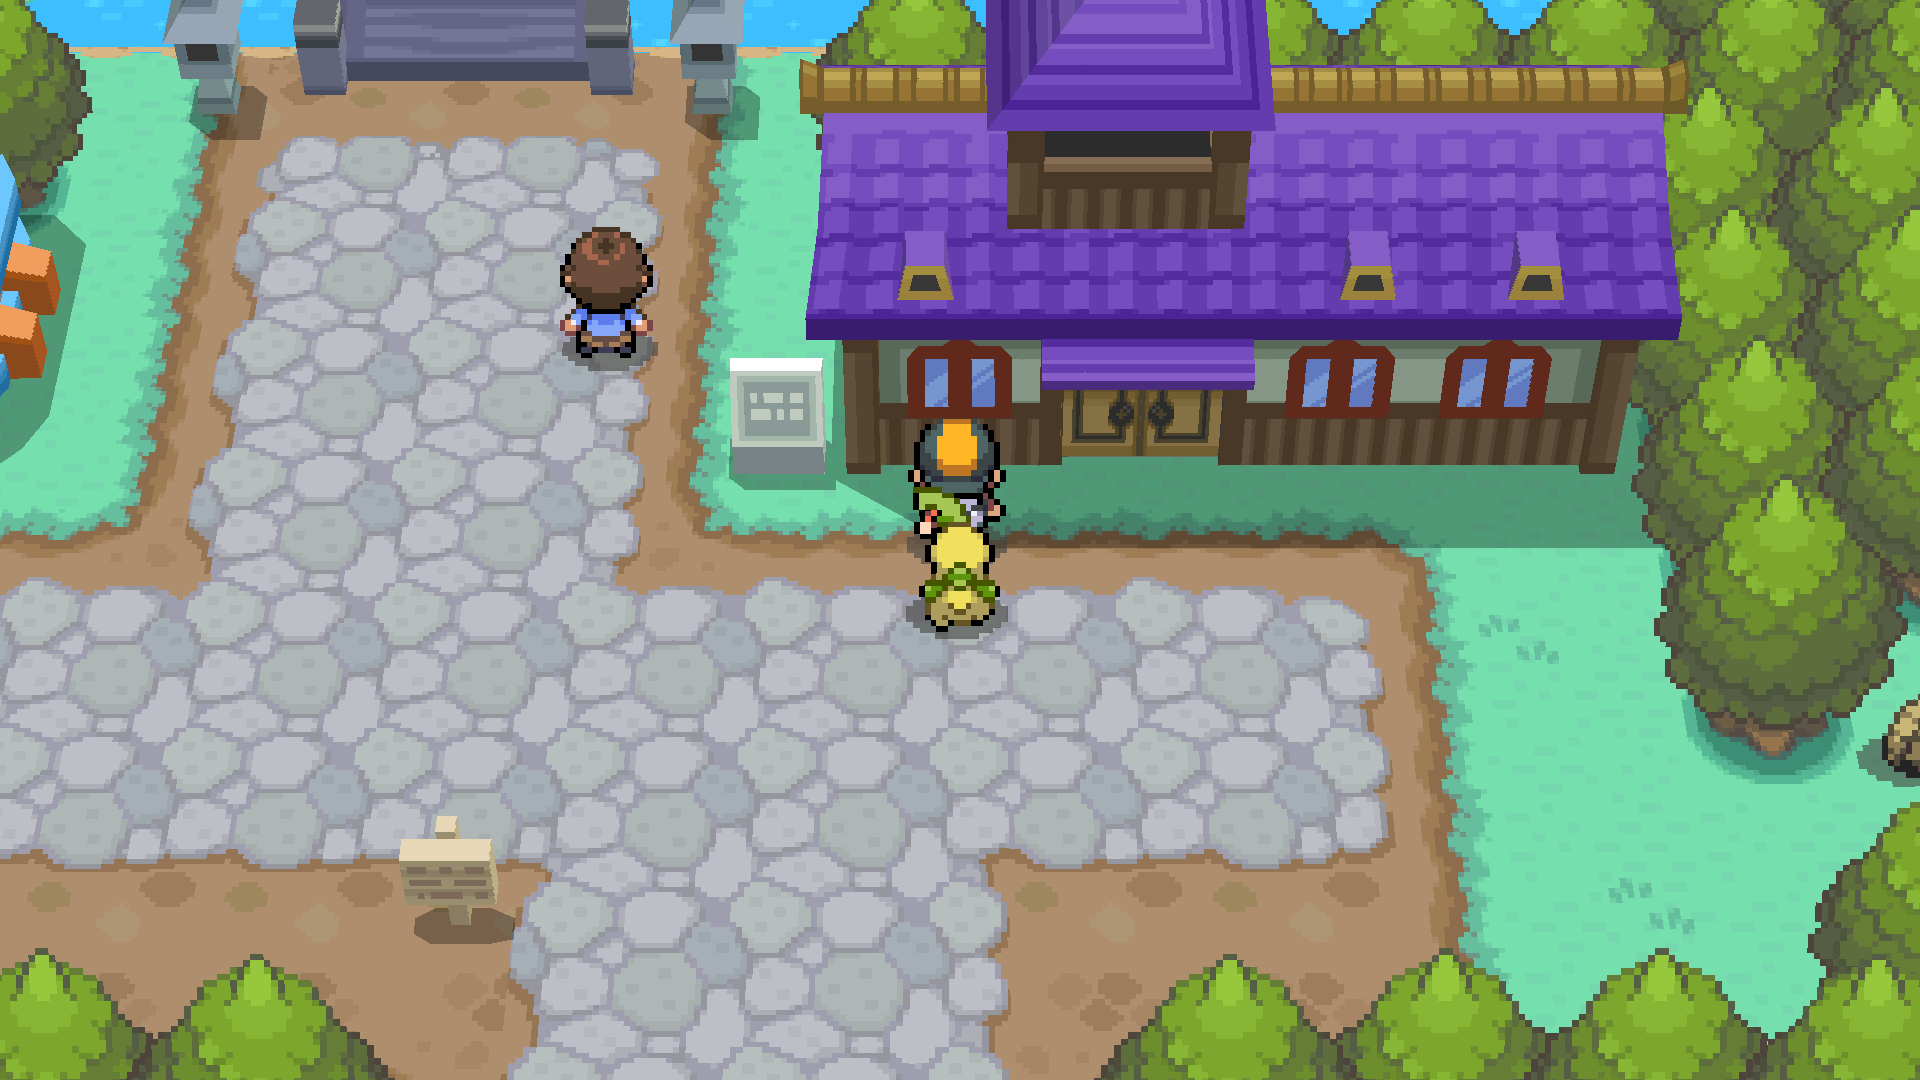
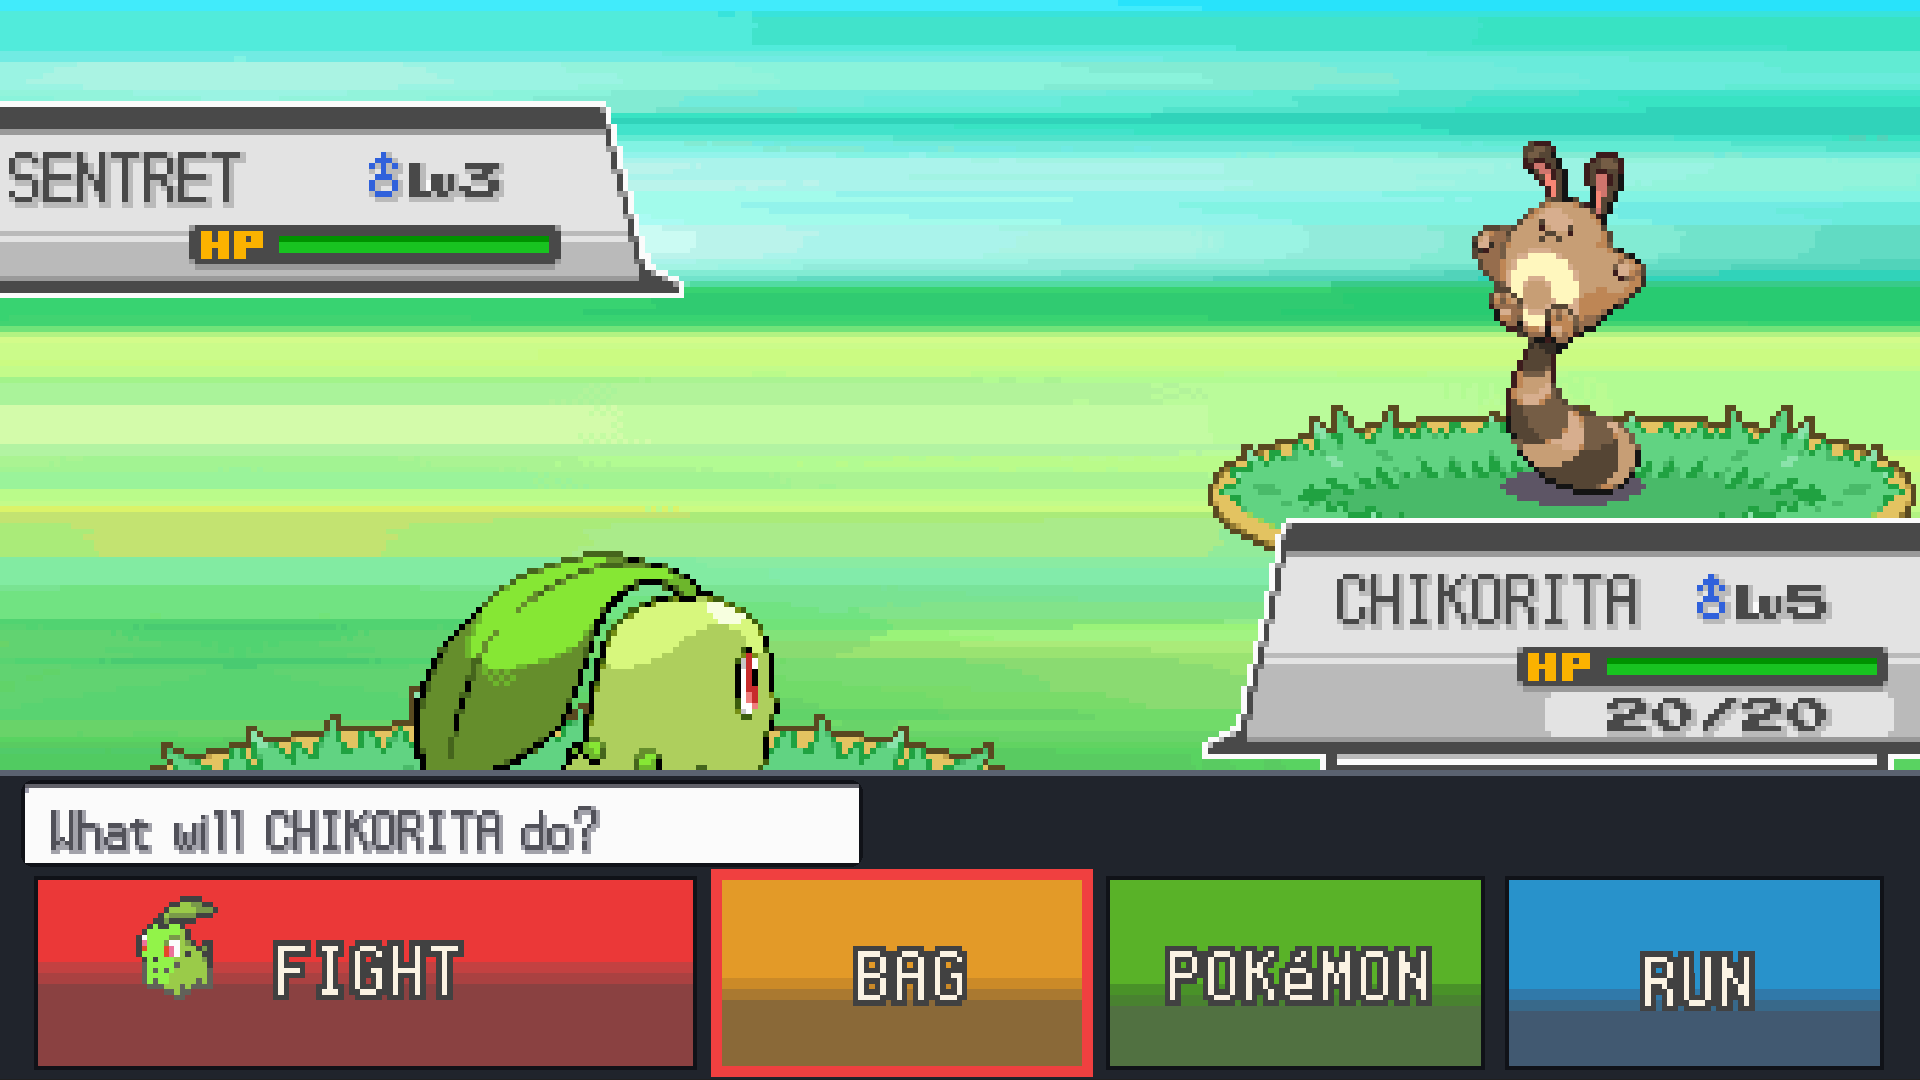
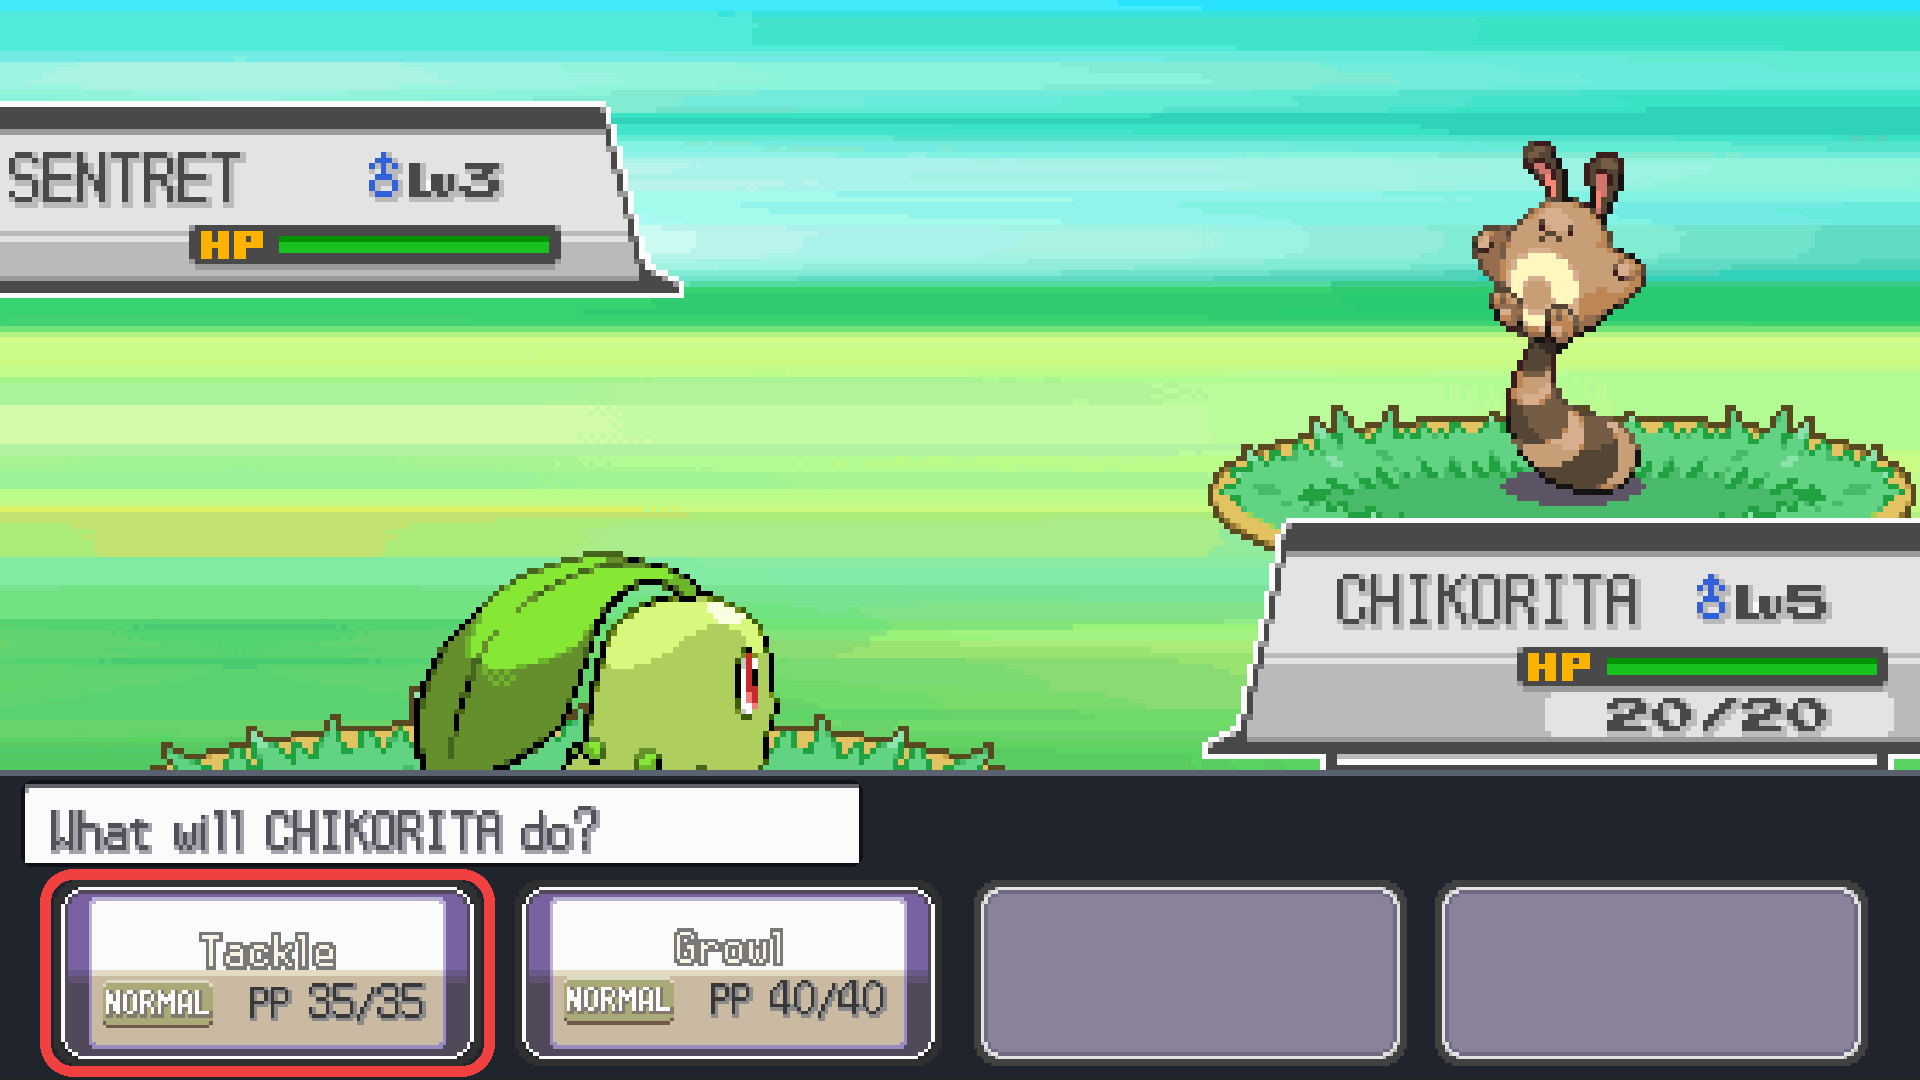
The overworld and battles drawn across a 16:9 screen, with the touch-screen buttons laid out along the bottom in battle (one screen, played with a controller):
 |  |
 |  |
Quick start
You need your own copy of Pokémon SoulSilver (US) as a .nds file, dumped from
your cartridge. Nothing of the game is in this repository or its releases.
-
Download the setup program for your system from the latest release:
- Linux PC:
ssrecomp-setup-linux-x86_64 - Linux on ARM (Raspberry Pi 4/5 with a 64-bit OS, other arm64 boards and
laptops):
ssrecomp-setup-linux-aarch64.AppImage - Windows:
ssrecomp-setup-windows-x86_64.exe
On Linux, make it executable (
chmod +x <file>, or the file's properties). - Linux PC:
-
Start it.
-
Choose your ROM, press Build, wait (the first build takes 20–40 minutes), then press Play.
macOS (experimental)
Apple Silicon and Intel builds target macOS 11 (Big Sur) or later. Install Xcode Command Line Tools and Python 3 with Tk, then run from this repository:
xcode-select --install
python3 -m pip install "cmake>=3.21,<4" ninja
python3 ssrecomp_setup.py
Choose your ROM, press Build, then Play. Without the setup window:
python3 ssrecomp_setup.py --rom "/path/to/your SoulSilver.nds"
./run.sh --fullscreen
Setup downloads and builds SDL2 and libpng automatically; Homebrew libraries
are not needed. The first build needs an internet connection. Builds resume
when setup is run again; add --jobs N to choose the number of compile jobs.
Use native arm64 Python on Apple Silicon or x86_64 Python on Intel.
The Mac setup download, when available, is a .zip containing
ssrecomp-setup.app; unpack it and open the app. Python/Tk is included, but
Command Line Tools, CMake and Ninja are still required. Development builds are
ad-hoc signed and may need approval in System Settings → Privacy & Security.
The frontend uses Metal and supports Retina displays. Control-Command-F or F11
toggles fullscreen. Full builds and boot/intro instruction comparisons have
passed on Apple Silicon; older macOS releases and Intel gameplay still need
hardware testing. Android builds and setup.sh's decompilation route are
currently unavailable on macOS.
Android (experimental)
The Android version is built on your PC by the same setup program, from your ROM, and installed on the phone or handheld (64-bit ARM, Android 7.0 or later):
- In the setup program, choose your ROM and press Build for Android. It needs only CMake and Ninja on the PC (see below); the first time it downloads Google's Android NDK (about 650 MB on Linux, 750 MB on Windows) and SDL2. The build takes about as long as the PC one.
- Copy
SoulSilver-ssrecomp.apk(in the setup program's folder) to the device, open it there and allow installing it when asked.
The APK contains your copy of the game: never share it. It is signed with a key
kept next to it (android/signing-key.json); builds made later with the same
key install over it and keep the save. Uninstalling the app deletes its save.
On the device: the touch screen works on the touch-screen parts of the picture,
and on-screen buttons are shown over it. Using a controller (Bluetooth, USB, or a
handheld's built-in controls) hides them; touching the screen brings them back.
The MENU button or Back opens the pause menu. Messages and frame timings go
to log.txt in Android/data/io.github.clickingmaster.ssrecomp/files on the
phone's storage (open it with a file manager, or from a PC over USB), which helps
with bug reports.
When a newer version is released, the app says so at start (it asks GitHub, its only use of the internet): update the setup program, press Build for Android again and install the new APK over the old one.
The setup program carries this project's source and unpacks it into a folder of
its own (~/.local/share/ssrecomp on Linux, %LOCALAPPDATA%\ssrecomp on
Windows, ~/Library/Application Support/ssrecomp on macOS), where the game is
built and its save is kept. It contains nothing of the game. Instead of the download you can also run python3 ssrecomp_setup.py
from a copy of this repository (then the game is built in that folder).
Updating: the setup window shows its version and whether a newer release is
out; Update downloads it, checks its checksum, replaces the setup program and
restarts it. Press Build once afterwards to rebuild the game with the new
version (your save and settings are kept). Without a display:
ssrecomp-setup-linux-x86_64 --update (or the Mac app's executable with --update), then --rom again.
Portable mode: put an empty file named portable.txt next to the setup
program (the .exe, the AppImage on Linux, or the .app bundle on macOS). Everything — the unpacked
source, the build, the save and the settings — then goes into a folder
ssrecomp-data beside it instead, so the whole thing can live on a USB stick or
another drive and move between PCs. Keep the ROM in that folder too (or on the
same drive), so it is still found when the drive letter changes. After moving to
another PC, Play works straight away; Build (only needed for updates) compiles
everything again, since the build remembers where it was made.
The window checks that the ROM is the right game and tells you if something
needed for compiling is missing, with the command to install it (with
python3 ssrecomp_setup.py instead of the download, add Python's Tk support:
python3-tk, python3-tkinter or tk):
-
Linux (Ubuntu, Debian, Mint):
sudo apt install cmake ninja-build g++ pkg-config libsdl2-dev libpng-dev zlib1g-dev -
Fedora:
sudo dnf install cmake ninja-build gcc-c++ pkgconf-pkg-config SDL2-devel libpng-devel zlib-devel -
Arch:
sudo pacman -S --needed cmake ninja gcc pkgconf sdl2 libpng zlib -
Immutable Linux (Bazzite, Silverblue, SteamOS): run it in a container:
distrobox create -n ssrecomp -i ubuntu:24.04
distrobox enter ssrecomp -- sudo apt install -y cmake ninja-build g++ pkg-config libsdl2-dev libpng-dev zlib1g-dev
distrobox enter ssrecomp -- ./ssrecomp-setup-linux-x86_64
The finished game also runs outside the container (
./run.sh). -
Windows (untested so far): install MSYS2 in its default place (
C:\msys64), open "MSYS2 UCRT64" and install the compiler and libraries withpacman -S --needed mingw-w64-ucrt-x86_64-gcc mingw-w64-ucrt-x86_64-cmake mingw-w64-ucrt-x86_64-ninja mingw-w64-ucrt-x86_64-SDL2 mingw-w64-ucrt-x86_64-libpng mingw-w64-ucrt-x86_64-zlibThe setup program finds them there by itself. (To run
ssrecomp_setup.pyinstead of the download, also installmingw-w64-ucrt-x86_64-pythonandmingw-w64-ucrt-x86_64-tkand start it from that window.)
Without a display: ssrecomp-setup-linux-x86_64 --rom your-rom.nds (or
python3 ssrecomp_setup.py --rom ...) does the same in the terminal; add
--android for the Android build on Linux or Windows.
Making the setup programs: pip install "pyinstaller>=6" certifi pillow && python tools/package_setup.py
on the system they are for; tools/make_appimage.sh wraps the Linux one into an
AppImage. On macOS it creates dist/ssrecomp-setup.app with Python/Tk included.
.github/workflows/release.yml packages Linux, Windows and separate Mac architectures
when started by hand from the Actions tab. Mac bundles are checked for dependency
paths and minimum OS versions before archiving. Set SSRECOMP_CODESIGN_IDENTITY
when packaging with a Developer ID; public distribution also needs notarization.
Mac builds compile pinned SDL2/libpng sources for the selected deployment target,
using the SDK's zlib. Advanced CMake builds can use installed libraries with
-DSSR_MACOS_SOURCE_DEPS=OFF; those libraries must support the chosen architecture
and OS version. MACOSX_DEPLOYMENT_TARGET (default 11.0) selects the minimum OS
for direct CMake builds. The setup workflow uses 11.0.
How it works without the decompilation: the code to recompile is read straight
from your ROM (tools/ndsrom.py). What the decompilation adds, which parts of
it are ARM or Thumb code and where the functions the frontend watches are, comes
from layouts/soulsilver-us.json, made with tools/make_layout.py; that file
holds addresses and checksums only. The generated code is identical to what the
decompilation's build gives.
If you want to change the game itself, build from the decompilation instead
with ./setup.sh (see "Building").
Running
./run.sh                 # windowed
./run.sh --fullscreen
First build it: see "Building" below. run.sh expects the ROM at
../pokeheartgold/build/soulsilver.us/pokesoulsilver.us.nds, i.e. the
decompilation checked out next to this repository and built. The save file is soulsilver.sav next to the script; settings
are remembered in ssrecomp.cfg.
Everything can be done from a controller:
| Action | Controller | Keyboard |
|---|---|---|
| D-pad | D-pad or left stick | arrow keys |
| A / B / X / Y | the buttons with those labels | X / Z / S / A |
| L / R | shoulders | Q / W |
| Start / Select | Start / Back | Enter / Right Shift |
| Pause menu | Guide, or Start + Select together | Esc |
| Touch screen | off by default; with "STICK TOUCH CURSOR" on in the pause menu: right stick moves a cursor, right trigger presses | mouse, or I J K L and Space |
| Fast forward (4x) | hold left trigger | hold Left Shift |
| Swap the large screen | click right stick (only with "STICK TOUCH CURSOR" on) | F1 |
| Next layout | click left stick (only with "STICK TOUCH CURSOR" on) | Tab |
| Quick save / load state | pause menu | F5 / F8 |
| Fullscreen | pause menu | F11 |
The pause menu also has the view, 60 FPS, smooth scaling, button mapping by label or by position, reset and quit.
run.sh also writes what the game prints to game.log next to it; a bug report
about a controller should include it (it lists every controller SDL sees).
Steam Deck / SteamOS: add run.sh to Steam as a non-Steam game. If a
controller does nothing that way, setting the shortcut's compatibility tool to
Proton Experimental (Properties → Compatibility) has been reported to make it
work.
Single-screen view
The default view (merged) shows one picture, with no second screen beside it
and no switching by hand. What it is made of depends on what the game is doing:
| Situation | What is shown |
|---|---|
| Overworld, dialogue | the top screen; on a wide display the world fills the whole view (see "Widescreen world") |
| A question in the overworld (Yes/No, PC and shop choices) | the answer buttons drawn at the right above the message box |
| X menu open | the menu panel at the right edge, mostly beside the overworld; the game's "look at the other screen" strip is not drawn. Coming back from the Bag, Pokegear and so on, that strip is also what tells the frontend the menu is up before the menu's own code runs again, so the overworld fades in with the panel already in place |
| Battle | the scene across the whole view: each row's outermost pixels continue into the sides, darkening outwards, so the sky, ground and HP boxes run to the edges |
| Battle, choosing a command or move | the buttons taken off the touch screen and laid out as a strip along the bottom in place of the message box, under a label with the message's first line ("What will X do?"): FIGHT, BAG, POKeMON, RUN, or the four moves (B cancels). Left and right walk along the row (empty move slots are skipped) and A presses the outlined button; the frontend does that by touching it, since the game's own cursor moves in the touch screen's two-row arrangement; nothing of the scene is covered. Other touch-screen questions in battle, and narrow views, get the whole touch panel as a card at the lower left |
| In-battle bag and party | that screen alone |
| Learning a fifth move | "Forget a move / Keep old moves" at the lower left, then the move picker and its confirm page alone |
| Bag | the item list with the description box from the other screen underneath |
| Poke Mart | the item description above the list of goods; quantity and confirmation in the same page |
| PC box | the selected Pokemon's info card beside the box |
| Pokedex list | one page: title bar across the top, name, picture and type/size card on the left, description above the number grid and its buttons on the right |
| Pokedex area, size, forms | one page: the title bar and the tab bar span the view, the two bodies are its columns |
| Pokedex cover, search | the closed cover as one tall picture; search as a two-column page |
| Party, options, trainer card, naming, save, Voltorb Flip, ... | the bottom screen alone |
| Summary | both halves joined into one page |
| Choosing a starter | the preview at the left edge, the tray of Poke Balls as a card on the right |
| Pokegear phone | clock above the contact list; during a call, the call screen |
| Pokegear map, town map | the location's description beside the map |
| New-game intro | the professor's screen in the middle with its backdrop continued across the view; for a choice it slides left and the choices stand beside him |
| Top screen blank (e.g. Continue menu) | the bottom screen |
| Any other screen that waits for a touch (e.g. Apricorn Box) | both screens joined as one spread, so nothing is hidden |
The right-stick touch cursor works through these overlays; if nothing touchable is on screen, moving it brings up the bottom screen. Clicking the right stick (F1) shows the other screen as an escape hatch for situations not covered yet.
The pieces are put together by the graphics card (frontend/gpucompose.h):
each is uploaded at DS resolution and scaled by the SDL renderer, so the cost
does not grow with the size of the window. MergedCompose in
frontend/merged.h draws the same picture on the CPU for the headless tests;
the two are compared with SSR_CPU_COMPOSE=1 and window screenshots (see
"Performance").
How it works: a patch to the 2D renderer records which graphics layer each
pixel came from, so a screen's background can be dropped and only its buttons
drawn (frontend/merged.h). The situation is recognised by which game
functions ran in the last few frames: tools/apps.py reads every
application's per-frame function, and the names in tools/focus_symbols.txt,
out of the decompilation's linker map. The rules are in pickScene in
frontend/main.cpp. A new layout must be asked for several frames in a row before
it replaces the one on screen, so transitions do not flash a wrong one.
The older layouts are still in the pause menu: hybrid, side, vertical,
top, bottom.
Widescreen world
In the merged view on a wide display the overworld fills the whole picture
instead of a 4:3 box, and is drawn at high resolution ("WIDESCREEN WORLD" and
"WORLD DETAIL" in the pause menu; wide and wide_lines in ssrecomp.cfg).
Because it is no longer limited to the DS's 256x192 pixels, the world also
moves in steps smaller than a DS pixel: walking up and down, where the camera's
tilt makes the DS scroll 2, 1, 2, 1 pixels, is even.
How it works (melonDS/src/GPU3D_Wide.cpp): every polygon the game submits is
recorded before clipping. When the frame is flushed, the list is submitted a
second time with the horizontal clip coordinate squeezed by 256 / (view width),
so that what lies left and right of the DS's view survives clipping, into
separate polygon memory. A separate rasteriser draws that list at the size of
the output (perspective-correct textures, depth, translucency, fog; no edge
marking or shadow volumes), on worker threads while emulation continues. The
frontend puts the picture behind the top screen and draws only the top screen's
2D pixels (text boxes, signs) over it; fades are applied to it from the
brightness registers, and 2D effects that touch the screen's edge (wipes) are
continued into the margins. The game sees the same polygon counts as without it, with one exception: the
box test, which the game uses to decide whether a tree or a building is in
view, is made against the wide view while widescreen is on, so that those are
also drawn beside the DS's own picture instead of popping in at its edge
(GPU3D::BoxTest). --lockstep therefore runs with widescreen off.
Battles, menus and everything that is not the overworld stay 4:3.
Known limits: anything the game culls by other means than the box test could still pop in at the far left and right (none found so far); there are no edge-marking outlines; 2D weather or overlays do not extend beyond the 4:3 area; "WORLD DETAIL" above 720 costs frame time (about 5 ms at 720 lines, 12 at 1080, 18 at 1440 on a 6-core desktop CPU). On slow devices, 384, 288 or 192 (the DS's own sharpness) cost the least; "FPS COUNTER" in the same menu shows whether the game keeps up.
60 fps
The game updates its 3D scene 30 times a second. With "60 FPS" on (the
default, in the pause menu), the 3D engine records the polygons of each frame
and, on the display frame in between, draws them halfway between their old and
new positions. Walking scrolls 1 pixel per frame instead of 2 every other
frame. Game speed and game state are unchanged, the 3D picture is one display
frame (1/60 s) later than without it, and 2D elements such as text boxes still
update at the game's own rate. A polygon is paired with its
counterpart in the previous frame by how the scene as a whole moved (found by
letting every possible pairing vote), and only if it moved roughly like that;
anything else is drawn where it now is. The polygon after the last partner is
tried first (objects keep their order in the list), the scene's movement is
voted on from both ends of the list so that a map block entering it does not
upset the vote, and a strip polygon whose neighbour was treated differently is
built on its own. SSR_PAIR_DEBUG=1 logs where the pairing changes step. Pairing with the nearest look-alike
instead drew models halfway towards a neighbour that had just left the picture
(SSR_PAIR_LOOSE=1 brings that back for comparison). It switches itself off when the scene does not
update on a steady 30 fps cadence, when polygons cannot be matched between
frames, and while the game captures the 3D image.
Performance
SSR_PERF=1 prints, every 300 frames, the average time spent per frame in
emulation, in choosing and drawing the picture, in presenting it and in
waiting for the next frame, and the longest frame. At 2560x1440 on a 6-core
desktop CPU the overworld with the widescreen world at 720 lines takes about
8 ms of the 16.7 ms a frame has.
What keeps it there:
- the DS-resolution 3D picture is drawn on its own thread (melonDS's threaded
software renderer;
SSR_NO_RENDER_THREAD=1turns that off), the widescreen picture on a pool of worker threads; - the graphics card composes the picture, through SDL's OpenGL ES renderer,
which uploads textures several times faster than its desktop OpenGL one here
(
SDL_RENDER_DRIVERoverrides the choice); - in recompiled code a branch to an instruction of the same chunk continues there instead of returning to the dispatcher (half as many dispatches);
- frames are paced by sleeping and then spinning for the last fraction of a millisecond, which keeps them an even 16.7 ms apart.
The recompiled code itself is now about 6–9% faster than the plain interpreter
(--interp): 1,800 frames of overworld from a save state, headless, take about
9.0–9.9 s against 9.9–10.6 s (the range is between runs on a busier or quieter
machine). What got it there:
- the common instructions (arithmetic, loads and stores, LDM/STM, PUSH/POP,
branches; about 97% of all) are translated to inline C++ with their operands
folded in (
tools/recomp_inline.py), instead of calling the interpreter's handler; each translation is chosen by the handler melonDS would run, so it does exactly what that handler does; - R15 is a constant in every statement, and after a translation that calls nothing only the time slice is checked;
- memory accesses to the TCMs and main RAM, and jumps, go through small
functions (
runtime/recomp_mem.cpp) instead of the core's general bus functions. Copying them into every instruction instead made the code 30 MB bigger and slower overall.
Around the recompiled code, in the melonDS core (--lockstep still passes, and
each change was checked to give the same pictures, sound and memory as before,
except the longer time slices, see below):
- the 2D renderer keeps each finished line and its sprites, and draws a line again only when something it is made from changed (the engine's registers, palettes, VRAM, OAM, the 3D line); most lines are the same as in the frame before. Text backgrounds are drawn a tile row at a time;
- the scheduler gives each CPU 512 cycles at a time instead of 64 (events still happen at their exact times; melonDS's own JIT is coarser). This is the one change to timing: of 2,312 test screenshots, 3 differ, each by one line during a battle transition;
- the ARM7 reads its code and data in main RAM and WRAM directly;
- loops that wait for the SPI bus (ARM7) or the game card (ARM9) are skipped to the end of the time slice in whole turns, so they end at the same cycle;
- the widescreen 3D draws opaque polygons nearest first, so hidden pixels are rejected before they are shaded;
- the interrupt path of melonDS's built-in BIOS (FreeBIOS), which runs at every
HBlank interrupt (most lines), is recompiled too (section
bios9), so no game code is interpreted any more.
Together that is about 30% less time in the overworld and 20% in battles than v0.3.0. The ARM9 game code is now about 60% of the main thread's time; most of the rest is the ARM7, the sound and melonDS's bookkeeping.
SSR_SAMPLE=<file> records about 1000 call stacks a second from whichever
thread is running (frontend/sampler.h); tools/samples.py build/ssrecomp <file> lists where the time went. To measure the real window path without
putting a window on the desktop, run the game inside a headless compositor:
SSR_PERF=1 gamescope --backend headless -W 2560 -H 1440 -w 2560 -h 1440 -- \
    build/ssrecomp <rom> --fullscreen --no-save --state-load <snapshot> --frames <n>
In a window, --shot-dir with --shot-at/--shot-every also writes
window_<frame>.png, read back from the renderer: exactly what is shown.
Building
Tested on Linux (Ubuntu 24.04 inside a distrobox on Fedora/Bazzite). Other Linux distributions should work the same way; Windows gameplay is untested. For the macOS direct-ROM workflow, see the macOS section above. The decompilation route below is Linux-only. Expect about half an hour for a first build.
What you need
-
The game. Only build this if you own Pokémon SoulSilver (US). The decompilation below rebuilds the game from its source; the result has to be byte-for-byte identical to the retail cartridge, which you can check against a dump of your own copy (SHA-1 below).
-
About 3 GB of free disk space and 16 GB of RAM. The generated code is large and the compiler needs about 1.5 GB per parallel job.
-
pret/pokeheartgold's build requirements — see its INSTALL.md.
-
For this project: CMake 3.16+, Ninja, a C++17 compiler (GCC or Clang), SDL2 (or sdl2-compat), libpng, zlib, and Python 3 with
pyelftools. On Ubuntu/Debian:sudo apt install cmake ninja-build g++ libsdl2-dev libpng-dev zlib1g-dev python3-pyelftoolsOn Fedora:
sudo dnf install cmake ninja-build gcc-c++ SDL2-devel libpng-devel zlib-devel python3-pyelftools.
Building from the decompilation
This is for working on the game's source (mods): the recompiled code then comes
from your build of the decompilation instead of from a ROM. ./setup.sh runs
these steps for you; they are here in case you want to do them
by hand or something goes wrong.
-
Put both repositories side by side.
run.shand the commands below assume this layout:some-folder/ ├── pokeheartgold/ (pret's decompilation) └── ssrecomp/ (this repository) git clone https://github.com/pret/pokeheartgold.git git clone <this repository's URL> ssrecomp -
Build SoulSilver with the decompilation (in
pokeheartgold/):cd pokeheartgold make soulsilverThis produces
build/soulsilver.us/pokesoulsilver.us.ndsplus the files the recompiler reads (the linked.nefand one.sbinper code section). Check the ROM is a faithful build:sha1sum build/soulsilver.us/pokesoulsilver.us.nds # f8dc38ea20c17541a43b58c5e6d18c1732c7e582If it differs, fix the decompilation build first (see its INSTALL.md); the recompiled code would not match the ROM.
-
Generate the recompiled code (in
ssrecomp/). This writesgen/, which is the game's code translated to C++: keep it to yourself, never commit or share it.cd ../ssrecomp python3 tools/recomp.py ../pokeheartgold/build/soulsilver.us melonDS/src gen python3 tools/apps.py ../pokeheartgold/build/soulsilver.us genThe first prints something like
121 sections, 25118 chunks, 1685104 instructions, 71 files. -
Compile:
cmake -S . -B build -G Ninja -DCMAKE_BUILD_TYPE=RelWithDebInfo
ninja -C build
This takes 20–30 minutes on a 6-core CPU:
gen/holds 1.69 million recompiled instructions. Ninja runs one job per CPU thread by default; with less than about 1.5 GB of RAM per thread, limit it (ninja -C build -j8for 16 GB). The result isbuild/ssrecomp. -
Run:
./run.sh --fullscreenrun.shstartsbuild/ssrecompwith the ROM from step 2 and keeps the save insoulsilver.savnext to the script. The ROM built in step 2 is identical to the cartridge, sobuild/ssrecomp <your own dump>.nds --save my.savworks too, as long as it is the same US SoulSilver ROM.
Later
- Updating: after pulling changes to this repository, run
ninja -C buildagain. After changing or updating the decompilation, repeat steps 2–4. - Mods: changes made to the game's source in
pokeheartgold/flow into the native build by repeating steps 2–4. - Rebuild times: changing
runtime/recomp_rt.h,runtime/recomp_gen.hor melonDS headers included byNDS.hrecompiles all ofgen/; frontend changes take seconds.
How the recompiled code works
tools/recomp.py reads the linked .nef for section addresses and the
$a/$t/$d mapping symbols, so it knows exactly which bytes are ARM code,
Thumb code or data in the main module, the ITCM block and all overlays. Every
instruction becomes a labelled statement inside a "chunk" function of up to
256 instructions (gen/rc_*.cpp).
runtime/recomp_gen.hdefines what one recompiled instruction does. It repeats the interpreter's per-instruction sequence (prefetch, execute, cycle accounting), so a recompiled run is bit-identical to an interpreted one. The execute step is inline C++ for the common instructions (tools/recomp_inline.py) and the melonDS handler for the rest.- Many overlays are linked at the same addresses.
runtime/recomp_rt.cppenters a chunk only after comparing its bytes with emulated memory, and each instruction checks its own opcode, so stale code is never executed. Anything not covered (the BIOS, code not yet loaded) falls back to the interpreter one instruction at a time.
Testing
The save states and input scripts used during development are not part of this
repository (save states contain game memory), so the examples below need ones
of your own: --state-save writes one.
build/ssrecomp <rom> --lockstep --frames 9000 --input test/play2.txt
--lockstep runs an interpreter-only console and the recompiled one side by
side and compares registers, flags, cycle counts and timestamps after every
ARM9 instruction. Other test options (--headless, --input, --shot-at,
--compose, --state-save/--state-load, --hash-every, --log-sections,
--shot-layers, --trace-funcs, --count-changes, --interp60)
are listed by running the binary with no arguments. --no-wide turns the
widescreen renderer off, --bench-compose composes the merged picture every
frame in headless mode so whole-frame time can be measured, and the environment
variable SSR_WIDE_PROF=1 prints the widescreen renderer's time per frame. tools/try.sh resumes from
a snapshot, runs an input script and tiles the screenshots; tools/mshots.sh
does the same for the merged view (tools/wshots.sh through the real window
path, inside a headless gamescope), and tools/scroll.py measures the scroll
between consecutive screenshots. With --log-sections and a shot directory a
screenshot is taken at every change of merged layout; tools/strip.py tiles a
shot directory into contact sheets, which is how layouts are reviewed in motion. Input scripts can
drive a virtual controller (pad:guide, pad:rt, pad:rx+, ...) to test the
controller paths without hardware.
To get around the game world in tests, --nav "x,z;x,z;..." walks the player to
a list of tiles (door tiles included; x,z,L keeps walking left into a side
door), using the overworld collision grid that
tools/navmap.py extracts (--nav-map; --nav-map-id <map id>=file adds the grid of one
interior, made by passing that map's matrix file to navmap.py; ladders need a push, x,z,U); the input script is held until it
arrives or, with --nav-stop-on-battle, until a battle starts. --battle-mash
fights battles by pressing A and tapping the left-hand moves in turn, --pos-every N prints the player's tile, --stop-at N quits at a real frame
(writing the --state-save snapshot), and
tools/navrun.sh wraps these; tools/grind.sh loops grass walking and healing to gain levels.
--log-sections also prints each change of merged scene, which shows where a new screen appeared in a long run. Tile coordinates of doors and people are in the
decompilation's files/fielddata/eventdata/zone_event/*.json.
Thanks
Thank you to DarthMDev for the macOS side of the project: the native macOS build and setup program (#7) and its self-updating (#11).
License
GPL-3.0-or-later (see LICENSE), as required by the melonDS core it is built
on. melonDS/ is melonDS 1.1 with changes for this project: recompiled-code
dispatch in the ARM9 loop, per-pixel layer flags in the 2D renderer, the 60 fps
in-between frames and the widescreen renderer (src/GPU3D_Wide.cpp, new). The
changes to existing melonDS files are listed in melonDS-ssrecomp.patch.
tools/android/skeleton.apk contains SDL 2.32.10's Android Java code
(org.libsdl.app, zlib license, copyright Sam Lantinga and contributors),
compiled by tools/android/make_skeleton.sh. The Android build also downloads
and builds SDL2 and uses Google's Android NDK under their own licenses.
Comentarios (0)
Inicia sesión para dejar un comentario.
Sé el primero en comentar sobre este juego.