

Ninja Master - Shinobi III
Port nativo de Ninja Master - Shinobi III para PC.
Ninja Master - Shinobi III
Port nativo basado en krazyjakee/ninja-master.
README del repositorio
Ninja Master brings Shinobi III: Return of the Ninja Master to the desktop with native gameplay, widescreen presentation, rebindable controls and quick saves. Graphics, music, sound and stage data load directly from your own cartridge dump.
This complete, unofficial port includes all seven rounds and is playable from start to finish. Full playthroughs have been tested on Linux and Windows.
Screenshots
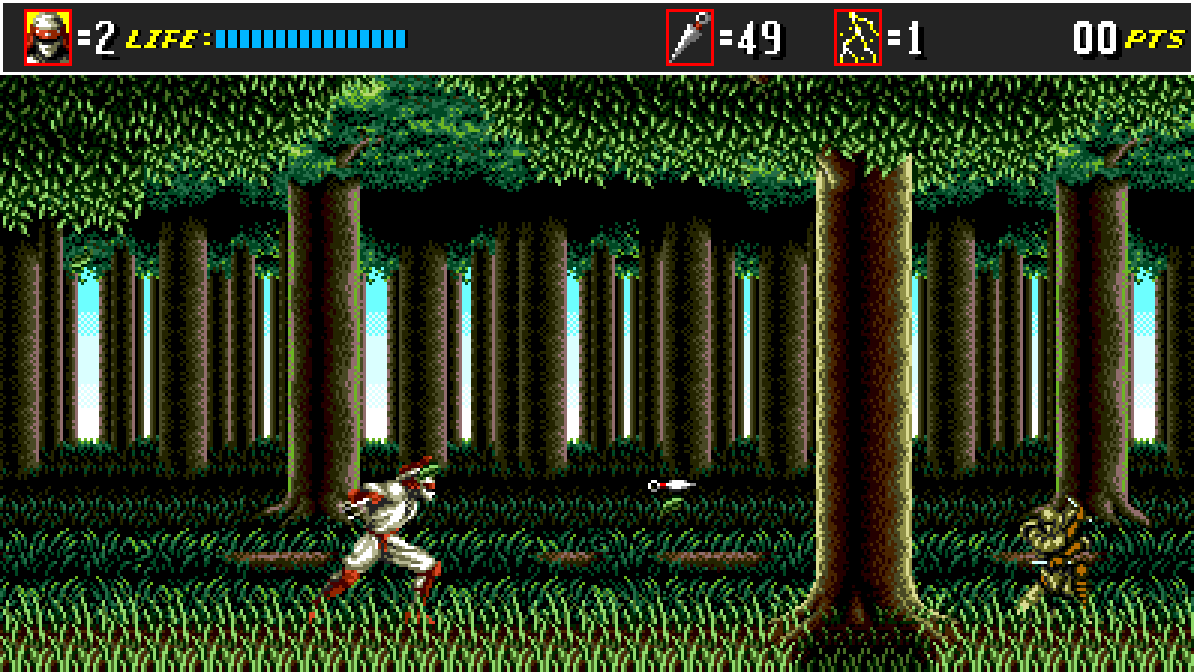
First level — Round 1-1
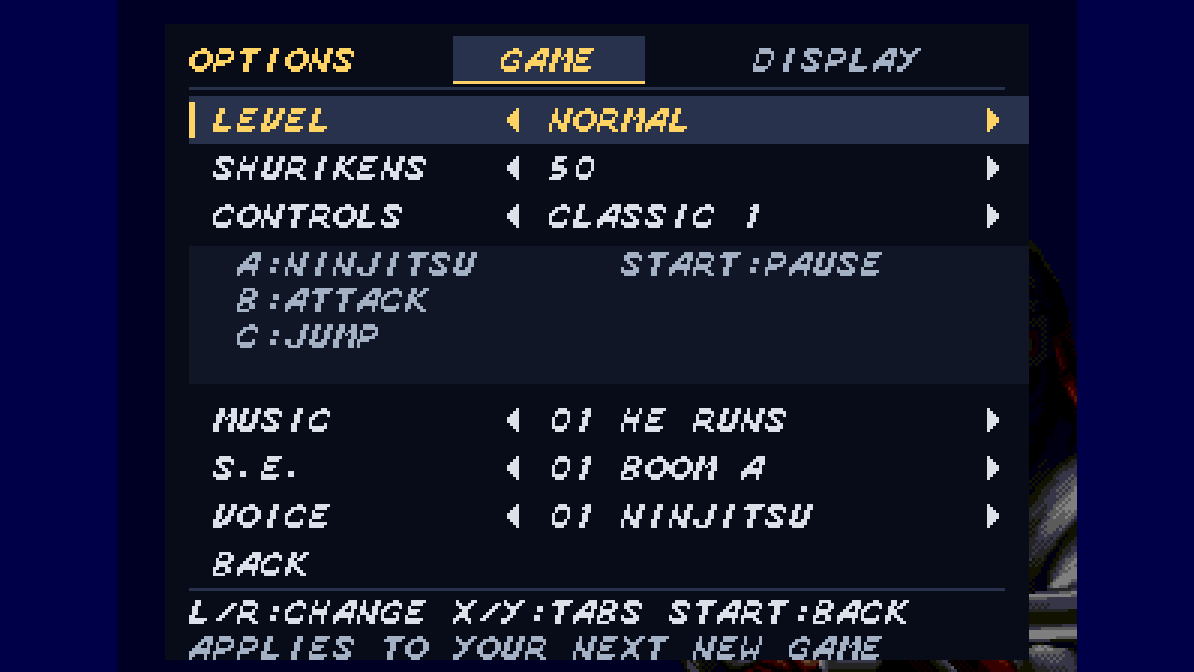
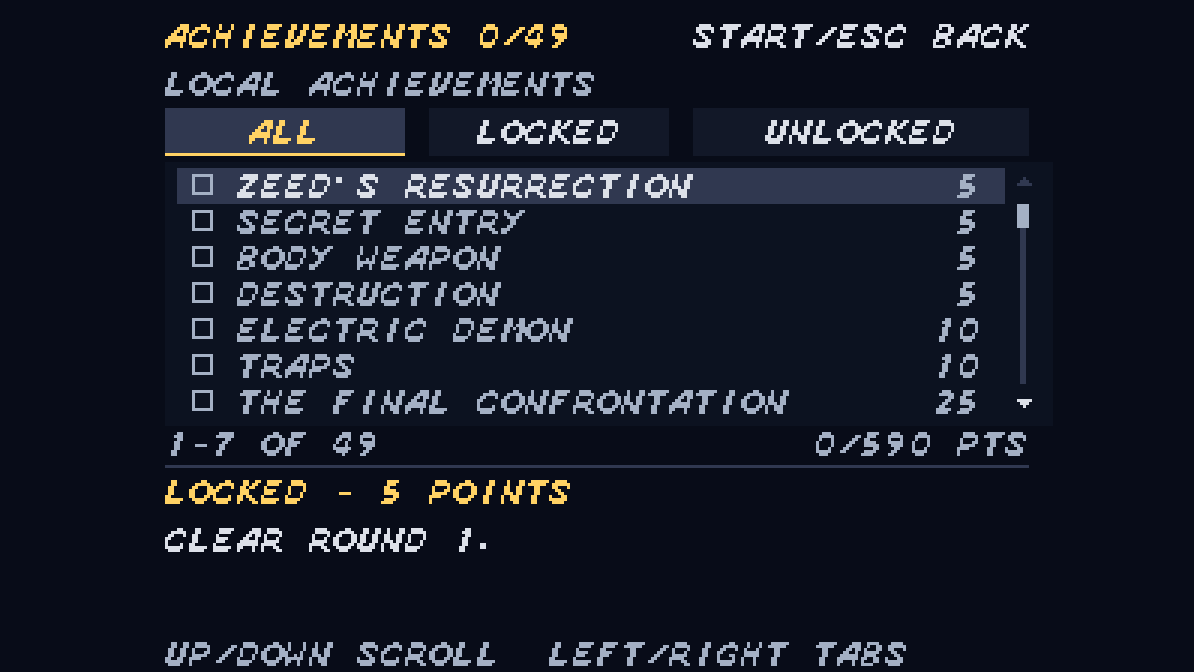
| Options | Achievements |
|---|---|
 |  |
Getting started
- Download a package for your platform from Releases.
- Have your own compatible ROM ready. No ROM or original game assets are included.
- Install or extract it as described below, then launch Ninja Master.
- Choose your ROM in the startup file picker. The game remembers its location for next time.
- Press Enter, select NEW GAME, and press Enter again.
You can also name your dump shinobi3_us.bin and put it beside the executable
(beside the .app on macOS). For a different location, pass --rom:
./ninja-master-native --rom "/path/to/your/game.bin"
On Windows, use ninja-master-native.exe --rom "C:\path\to\your\game.bin".
The NINJA_MASTER_ROM environment variable can also point to your ROM.
| Platform | Download | Install and launch |
|---|---|---|
| Windows 10/11, 64-bit | .msi installer | Open the MSI, then launch Ninja Master from the Start menu. Installs for your user account. |
| Windows portable | .zip | Extract the folder and open play.bat. Keep SDL2.dll beside the executable. |
| Debian / Ubuntu, 64-bit | .deb | Run sudo apt install ./ninja-master-*-linux-x86_64.deb, then launch Ninja Master from your app menu. |
| Fedora / RPM Linux, 64-bit | .rpm | Run sudo dnf install ./ninja-master-*-linux-x86_64.rpm, then launch Ninja Master from your app menu. |
| Linux portable | .tar.gz | Extract the folder and run play.sh. Install your distribution's SDL2 runtime first. |
| macOS 15+, Intel | macos-x86_64.dmg | Open the DMG, drag Ninja Master.app into Applications, then open it. |
| macOS 15+, Apple Silicon | macos-arm64.dmg | Open the DMG, drag Ninja Master.app into Applications, then open it. |
Windows and macOS downloads bundle SDL2; they do not need a separate SDL2 installation. DEB and RPM packages install their runtime dependencies through your package manager. Linux builds are tested on Ubuntu 24.04 and Fedora; older distributions may need newer system libraries.
Windows installers are not publisher signed. Mac apps are ad-hoc signed and
not notarized. If macOS blocks the first launch, use
System Settings → Privacy & Security → Open Anyway.
Uninstalling the Windows application preserves ROM files you add and your
settings and saves. Each download has a .sha256 file for verifying its checksum.
Compatible ROM
The following original 1993 retail cartridge dumps are supported. Each must be
1,048,576 bytes (1 MiB), in plain big-endian binary .bin format without
a copier header or SMD interleaving. Filenames do not establish compatibility.
| Region / version | CRC32 | SHA-1 |
|---|---|---|
USA — Shinobi III, MPR-15674-F | 5381506f | 1e07d7998e3048fcfba4238ae96496460e91b3a5 |
Europe — Shinobi III, MPR-15798 T57 | 0b6d3eb5 | 23579c8f7e2396080b478b113aff36d2382395a3 |
| Japan / Korea — The Super Shinobi II | 5b412816 | e3dbe326aa93320d405c561c306fc3954ab8ea7c |
These identities match MAME's Mega Drive cartridge catalog. Startup reports the detected release and rejects modified, prototype, zipped and interleaved images. Supply a dump of your own compatible cartridge. The Japanese version uses its own relocated data and Japanese story/ending font and text. All regions run at the native port's 60 Hz simulation/audio cadence; the European ROM does not switch the application to PAL 50 Hz.
To check SHA-1, use sha1sum game.bin on Linux, shasum -a 1 game.bin on macOS,
or Get-FileHash -Algorithm SHA1 game.bin in Windows PowerShell.
How to play
Default controls follow the Mega Drive three-button layout:
| Action | Keyboard | Controller |
|---|---|---|
| Move / crouch | Arrow keys | D-pad or left stick |
| Ninjutsu (A) | A or Z | West face button |
| Attack (B) | S or X | South face button |
| Jump (C) | D, C or Space | East face button |
| Start / pause | Enter; Escape also pauses during play | Start |
- Run: double-tap Left or Right.
- Jump: hold Jump for more height. Press Jump again near the top of a jump to somersault.
- Attack: use Attack to throw a shuriken; nearby enemies select a melee attack.
- Hang: hold Up while jumping toward a ceiling or hang bar. Move along it with Left/Right; Down + Jump drops and Up + Jump climbs where possible.
- Ninjutsu: press A/Z to use your selected technique. Pause, choose a technique with the directions, then resume with Enter.
- Quit during play: pause, then press Attack followed by Jump.
The title's OPTIONS menu has Game and Display tabs. Game adjusts difficulty, starting shurikens and control scheme. DISABLE is a distinct melee-only shuriken setting: it hides the ammo HUD, suppresses shuriken pickups and ranged attacks, and follows the run through deaths, continues, stages and saves. Finite aerial bursts fire only the ammunition remaining. Techniques can be selected with zero uses; casting still requires a use. These choices and your bindings persist across application restarts. Choose a classic layout, 6 BUTTON, or DEDICATED. All keyboard and controller bindings can be changed or restored in F1 → Controls, where the scheme selector and action names explain each input.
| Pad input | Six-button action | Dedicated action | Default keyboard | Default controller |
|---|---|---|---|---|
| A | Guard | Ninjutsu | A / Z | West face |
| B | Melee | Melee | S / X | South face |
| C | Jump | Jump | D / C / Space | East face |
| X | Shuriken | Shuriken | Q | Left shoulder |
| Y | Shuriken | Guard | W | Right shoulder |
| Z | Ninjutsu | Ninjutsu | E | North face |
| Mode | Cycle technique | Cycle technique | Tab | Back / View |
| Start | Pause / confirm | Pause / confirm | Enter | Start |
Guard works immediately, without throwing first. Melee remains available with no ammunition; an empty dedicated shuriken action does nothing. Classic attack retains the original proximity-based choice.
Menus support keyboard, controller and mouse together. Hover selects a row; click activates it. In Options, click the Game or Display tab, use pad X/Y (Q/W or the controller shoulders by default), or move Up from the first setting and use Left/Right to change tabs. Each tab keeps its settings visible. Use the arrows or click the left or right side of a value to change it. Click a sound-test label to play it; right-click anywhere on its row to stop it, including voice previews. Hold a direction to repeat navigation or value changes. The footer explains the selected setting and confirms sound-test actions. The S.E. list also includes the two driver effects omitted by the original menu, labelled SFX $AB and SFX $D7 because the ROM provides no names. Use the wheel or directions to scroll. Arrows indicate more rows above or below; keyboard/controller selection stays visible and returning from Options preserves main-menu focus. Escape or controller Back / View goes back, cancels a confirmation or resumes pause. Start skips the SEGA logo at any point without activating the next screen.
NEW GAME starts a fresh run with your chosen options and asks before replacing
an existing saved run. CONTINUE resumes the latest automatic checkpoint,
including position, health, ammunition, lives, score, technique and run options.
Checkpoints are saved every five seconds of simulation, at mode transitions,
and on normal application exit, in continue.nms beside your settings.
Continue restores gameplay directly, including when the checkpoint was taken
while paused or showing a round card. Completed or exhausted runs clear it.
Checkpoints replay your inputs, so a newer build can play them out
differently; Continue then restarts the checkpoint's substage from its start
with fresh score, lives and ammunition. Continue is hidden when there is no
compatible checkpoint; damaged files produce a message without starting a
game. It is separate
from the original game-over continues and the eight manual save slots.
Practice
Choose PRACTICE on the main menu, then Explore or Time Trial. Both stage lists unlock each stage only after you clear it in the normal game. Previously earned round-clear achievements also unlock that round's stages. Use Escape, controller Back / View, or A (A/Z or the west face button by default) to return one menu level; you can also click the back label. Enter / Start, Attack or Jump confirms your selection.
Explore keeps the stage's terrain, hazards and pickups, with enemies and bosses removed. Time Trial keeps the enemies and races a cyan ghost of your fastest completed attempt. Its stage list shows every saved best time. Clears and failed attempts return to the stage list; pause and choose Quit to Menu to return there early. Pause stops the trial clock. Death ends an attempt, and cheats or simulation modifiers prevent a new record.
Best times and ghosts persist in profile.json. Practice leaves your normal
Continue checkpoint intact and does not unlock stages or achievements. Manual
saving is unavailable during these practice sessions.
Expansions
Choose EXPANSIONS on the main menu to play new stages from expansion
packs. Drop a pack folder or ZIP into the expansions folder beside the
executable (beside the .app on macOS) and pick it from the list. A run
starts at the expansion's first stage and returns to the list when it ends.
Expansions never affect the original game. Their runs earn no achievements, statistics or practice unlocks, don't replace your CONTINUE checkpoint, and can't be saved to the manual save slots.
Packs contain no original game content. Each stage is built on an original stage part, which supplies the art, music, enemy types and any boss from your own ROM. A stage can replace that part's layout with its own metatile grid, add new metatiles painted in the base stage's palettes, place its own enemies, and move the start and exit. native/sample-expansions has a sample pack and the format reference.
To make a pack, choose EDITOR on the main menu. The expansion editor
opens in its own window beside the game. You can also run
ninja-master-native --editor to start a new pack, or
ninja-master-native --editor PACK-FOLDER to open one. The editor draws each
part with your ROM's art. It edits rounds, stages and parts, paints layouts,
places enemies, the start and the exit, and assigns art cells. It also checks
the pack for problems, and F5 playtests the part you're editing in a game
window. A pack can also be played directly with
ninja-master-native --play --expansion PACK-FOLDER.
Achievements and statistics
The main menu now includes Achievements and Statistics, with keyboard, controller and mouse navigation. Browse all 49 local achievements (590 points), filter by locked/unlocked state, read requirements and see unlock notifications. The Statistics screen has Standard, Practice and Best Times tabs. Run and lifetime values use labelled columns; select a row to read exact values. Hold Up/Down, use the mouse wheel or click the scroll controls to browse; Left/Right changes tabs. Unlock popups wait until you leave these screens. Statistics include active playtime, completions, deaths, continues, enemy defeats, shurikens, melee hits, magic, collected items and best round times.
Start New Game for eligible achievement progress. Automatic Continue
preserves it. Manual save loads, cheats, developer stage starts and simulation
modifiers mark the run as Practice; display/control settings and ordinary pause
are allowed, as is starting with Disable shurikens. The profile persists in
profile.json beside your settings and protects lifetime totals against replaying
old saves.
Achievements are local equivalents of the public RetroAchievements set; they are not submitted to or verified by RetroAchievements. Account integration is unavailable under its current native-port policy. See the complete condition mapping and persistence rules.
Make it yours
Press F1 to open the companion panel. The game continues running while the panel is open; pause first if you need time to adjust settings.
| Shortcut | Action |
|---|---|
| F1 | Controls, audio, saves and tools panel |
| F2 | Toggle performance overlay |
| F3 | Guided control rebinding |
| F5 / F6 | Save / load the selected save slot |
| F7 / F8 | Smaller / larger window |
| F9 / F10 | Lower / raise volume |
| F11 | Toggle fullscreen |
| F12 | Save a PNG screenshot |
Open Options → Display on the title menu for three groups:
- Window: fullscreen, window size, and widescreen or the original view.
- Scaling: aspect ratio and integer scaling for sharp whole pixels or a larger image.
- Effects: scenery waves, CRT filter, curvature, and scanline strength.
Changes preview immediately and persist across restarts. Widescreen adapts to your window or monitor, including ultrawide displays. Dependent controls explain when they are unavailable. Click a percentage bar to set curvature or scanlines; Reset Display restores these nine display preferences without changing game, audio, or control settings. F7/F8 and F11 remain available during play. F2 shows current and average FPS, frame time, a scrolling 240-frame graph, CPU raster/upload/submission times, presentation wait, sprite count, upload size and rendering resolutions. Measurements describe presentation and leave the 60 Hz simulation unchanged. F1 and F2 can be shown together; F1 has priority where their panels overlap in small windows.
F12 saves the displayed game viewport at its displayed pixel dimensions and
aspect ratio, including the game HUD and CRT/scanline effects. Desktop panels,
the F2 overlay, desktop notifications and letterboxing are excluded. In-game
achievement notifications are included. Files go into
screenshots/ beside settings.ini (or the working directory if no configuration
folder is available), with unique names. A brief message shows the saved path or
failure. PNG encoding runs in a background worker; holding F12 saves once.
Controls lets you rebind keys and choose a controller. Saves provides eight slots. Art packs lets you select custom artwork or return to the original graphics from your ROM.
Audio packs replace music, sound effects and voices with your own Ogg
Vorbis or WAV files (mono or stereo, any sample rate). Drop a pack folder or ZIP
into the audio-packs folder the tab shows and choose it from Audio; the
choice applies immediately and is remembered. A pack can replace as little as
one track: everything it leaves out keeps the original sound. Export audio
template renders every track, effect and voice from your ROM to WAV (about
400 MB, in the background) with an audio-pack.json listing each one's
driver command and sound-test name. Replace files one by one and delete
entries you do not change. The rendered WAVs carry the original loop points
themselves, so a file you swap in for a looping track loops whole; give it
its own loop points (a WAV smpl loop or Ogg LOOPSTART/LOOPLENGTH tags),
or set loop_start/loop_end in its sample frames, to loop part of it.
Loop points that do not fit a file are ignored, and a file that cannot be
read keeps the original sound; the tab lists both. Entries whose files the
pack leaves out keep the original sound. Every file plays at the loudness
of the original it replaces (measured from your ROM while the pack loads in
the background), and volume adjusts from there; voices always play once.
Replacement music follows
pause dimming and fade-outs, and replacement effects keep the original
priority and interruption rules. The original sequences keep running silently,
so timing, saves and replays are unchanged.
Settings and saves persist in your user configuration folder:
| Platform | Folder |
|---|---|
| Windows | %APPDATA%\ninja-master\ |
| macOS | ~/Library/Application Support/ninja-master/ |
| Linux | $XDG_CONFIG_HOME/ninja-master/ or ~/.config/ninja-master/ |
Gameplay comparison checks
Focused cartridge tests and numeric original-ROM traces are described in native/tests/data/fidelity.txt. The double-jump movement and animation matched the original sample; their tuning is preserved. Classic melee now samples proximity before turning, as the original does. The first forest boss exit walks into the broken opening and transitions before Joe reaches the pit beyond it.
Rendering development
The desktop uploads each game frame only to its active presentation path. F2 reports CPU composition, RGB resolution, upload and presentation costs separately. The CPU renderer remains the gameplay and headless fidelity reference.
Run python3 tools/benchmark_rendering.py --out out/rendering --frames 60 for
procedural native/HD, widescreen/ultrawide and CRT benchmarks at 1080p, 1440p and
4K. Add --rom /path/to/game.bin for real stage samples. A desktop OpenGL display
is required. Results include raw samples, timing distributions, transfer counts,
hardware metadata and pixel comparisons for the experimental GPU tile atlas.
See rendering measurements and backend decisions.
License
The project's original code and app artwork are available under the MIT license. Third-party dependencies retain their own licenses; binary packages include their notices.
Shinobi III, its characters and original game content belong to Sega. This project is not affiliated with or endorsed by Sega. The repository and release archives do not include ROMs, extracted game assets, music or disassembled game code. The MIT license does not grant rights to the original game content.
Comentarios (0)
Inicia sesión para dejar un comentario.
Sé el primero en comentar sobre este juego.